Showing posts with label Pies. Show all posts

5/02/25

Millionaire Pie

Also called Million Dollar Pie, this no-bake dessert features pineapple and cherries in a rich and creamy filling mixed with pecans and coconut for the perfect combination of texture and flavor! 

JUMP TO RECIPE

There's some magic that happens when you combine sweetened condensed milk with real lemon juice. Well, maybe I should say there are two magical things that happen. Plus chemistry.

The first is that the combination naturally thickens into pudding. The acid from the lemon juice reacts with the milk to turn it into nature's custard. It's pretty spectacular and is the reason my grandmother's favorite recipe, Italian Bakeless Cake (which is not Italian and not cake, btw) works so perfectly.

The second is the spectacular taste. These two ingredients work together to create a super fresh flavor that's bight, crisp and tart but still sweet in the best way. And it is the perfect backdrop for the other ingredients. 

Millionaire Pie! Also called Million Dollar Pie, this no-bake dessert features pineapple and cherries in a rich and creamy filling mixed with pecans and coconut for the perfect combination of texture and flavor!

INGREDIENTS NEEDED FOR MILLIONAIRE PIE

  • Graham cracker crust
  • Sweetened condensed milk
  • Fresh lemon juice
  • Crushed pineapple
  • Maraschino cherries
  • Sweetened flaked coconut 
  • Chopped pecans
  • Cool whip

Millionaire Pie! Also called Million Dollar Pie, this no-bake dessert features pineapple and cherries in a rich and creamy filling mixed with pecans and coconut for the perfect combination of texture and flavor!

FAQ ON MILLIONAIRE PIE

1. Do I have to use FRESH lemon juice?  Yes. I can't confirm that the Ph is the same in the fake stuff so I don't know if it will work with the sweetened condensed milk the same way (and thicken properly). Also, it just doesn't taste good.

2. Can I omit the coconut?  Perhaps. I can't say so for certain but it seems to me that the coconut helps support the filling which isn't super firm. If you omit it, wring the pineapple out with a clean dishtowel to ensure ALL excess juice is removed.

3. Why didn't my pie set up?  There are only a few reasons for this recipe to fail. The most important is substituting or omitting the fresh lemon juice and sweetened condensed milk (that combo is what thickens the filling). It's also super important to drain the pineapple VERY WELL and allow the pie to chill a minimum of 6 hours (overnight is best!).

Millionaire Pie! Also called Million Dollar Pie, this no-bake dessert features pineapple and cherries in a rich and creamy filling mixed with pecans and coconut for the perfect combination of texture and flavor!

4. Isn't Millionaire Pie supposed to be pink?  The original recipe (from Eagle Brand) did not include cherries. As folks changed the recipe over the years, cherries were added. Some of the newer versions include adding cherry juice which is why some of the pies are pink. You can certainly add cherry juice if you'd like but go easy because the more liquid in the recipe, the looser the filling will be.

5. Can I leave out the cherries?  Yep! As I mentioned in the note above, the original recipe from Eagle Brand did not include cherries.

6. Can I substitute other nuts for the pecans?  Sure! I imagine walnuts and almonds would be lovely in this!

Millionaire Pie! Also called Million Dollar Pie, this no-bake dessert features pineapple and cherries in a rich and creamy filling mixed with pecans and coconut for the perfect combination of texture and flavor!

7. Can I leave the nuts out all-together?  I suppose you can but I think the texture adds SO MUCH to this pie and is one of the things that make it so magical.

8. Does this pie freeze well?  YES!! Freeze firm without garnishing or covering the pie. Once frozen, cover well with foil or several layers of plastic wrap then freeze up to 3 months. Defrost in the refrigerator.

9. What's the best way to drain the pineapple?  I usually pour into a colander then let set over a bowl, uncovered, in the fridge overnight. If you don't have time for that, strain it in a colander then pour onto a clean kitchen towel so the towel can absorb the extra juice.

Millionaire Pie! Also called Million Dollar Pie, this no-bake dessert features pineapple and cherries in a rich and creamy filling mixed with pecans and coconut for the perfect combination of texture and flavor!

MORE FRUITY NO-BAKE DESSERTS

STRAWBERRY SHORTCAKE DESSERT - An easy layered dessert made in a 13x9 dish perfect for potluck dinners, cookouts or family gatherings! 

PAULA DEEN'S BANANA PUDDING - This iconic recipe isn't the Banana Pudding you grew up with but it's a classic for a reason - it's insanely delicious! 

BANANA SPLIT DESSERT - A layered dessert with pineapple, strawberries, chocolate syrup and nuts with a decadent cream cheese filling and graham cracker crust. 

ITALIAN BAKELESS CAKE - A layered no-bake dessert with vanilla wafers and creamy pineapple “pudding” topped with cool whip, coconut, cherries and pecans. 

BLACK FOREST OREO DESSERT - A decadent no-bake icebox dessert recipe layered with Oreo cookies, chocolate pudding and cherry pie filling. 

Recipe for Millionaire Pie

Millionaire Pie! Also called Million Dollar Pie, this no-bake dessert features pineapple and cherries in a rich and creamy filling mixed with pecans and coconut for the perfect combination of texture and flavor!

Millionaire Pie

Millionaire Pie
Yield: 8 Servings
Author: Mandy Rivers | South Your Mouth
Prep time: 10 MinInactive time: 6 HourTotal time: 6 H & 10 M

Also called Million Dollar Pie, this no-bake dessert features pineapple and cherries in a rich and creamy filling mixed with pecans and coconut for the perfect combination of texture and flavor! 

Ingredients

  • 1 deep dish graham cracker crust
  • 1 14-oz can sweetened condensed milk
  • 1/4 cup fresh lemon juice
  • 15-oz can crushed pineapple, well drained
  • 1 cup chopped maraschino cherries
  • 1 cup sweetened flaked coconut
  • 1/2 cup chopped pecans
  • 8-oz tub cool whip, thawed

Instructions

  1. In a large bowl, combine sweetened condensed milk, lemon juice and pineapple then mix well.
  2. Stir in cherries, coconut and pecans.
  3. Fold in cool whip then spoon mixture into graham cracker crust.
  4. Refrigerate 6 hours or overnight.

Notes

  • Drain the pineapple VERY WELL. I usually pour into a colander then let drain into a bowl, uncovered, in the fridge overnight. 
  • Starting with chilled pineapple, lemon juice and cherries helps the pie set up more quickly.
  • I like to drain the cherries on paper towels before chopping.
  • For perfect slices, consider freezing an hour before serving. 
  • See FAQ above for other tips and pointers. 
million dollar, sweetened condensed milk, graham cracker crust, pineapple, pecans, lemon, icebox, cream pie, no-bake, easy, original, best, cherries, pecans, lemon juice, pudding
dessert
American
Keep up with my latest shenanigans by following South Your Mouth!


3/28/25

Easy Coconut Cream Pie

A simple recipe for rich, creamy coconut pie with a mousse-like consistency using easy-to-find ingredients.

TABLE OF CONTENTS:

  1. JUMP TO THE RECIPE
  2. HOW TO TOAST COCONUT
  3. FAQ ON CREAM OF COCONUT
  4. MORE COCONUT DESSERT RECIPES

Coconut always makes me think of two things: Easter Sunday and Nanny (my paternal grandmother).

Nanny would buy whole coconuts at Eastertime then whittle and extract every last gram of goodness from them.

She'd even save the coconut water when she cracked them open to bake slices of sweet potato in with butter, brown sugar and cinnamon.

Easy Coconut Cream Pie! A simple recipe for rich, creamy coconut pie with a mousse-like consistency using easy-to-find ingredients.

She made an assortment of coconut desserts including those green "grass" cupcakes with jelly bean eggs on top, her Italian Bakeless Cake (which was neither Italian or a cake but always my favorite!) and this simple cream pie that's my go-to recipe for Coconut Cream Pie!

She also made a giant 6-layer coconut cake that took days to make. Each layer was painted with a coconut syrup before she layered them between a moist coconut icing then the whole thing was frosted with a thin buttercream.

That's it on the left in the picture below. And yes, that's me trying to snag something sweet off the dessert table when I didn't think anybody was looking. I've heard Pa saved my behind that day and kept my mama and aunts from getting my butt for that!

Easy Coconut Cream Pie! A simple recipe for rich, creamy coconut pie with a mousse-like consistency using easy-to-find ingredients.

HOW TO TOAST COCONUT

There are two ways to toast coconut: on the stove and in the oven. I typically use the oven method because the coconut toasts more evenly but either method works! Below are instructions for toasting 2 cups sweetened flaked coconut.

OVEN METHOD: Spread coconut evenly on a large baking sheet then bake at 350 degrees (preheated oven) 8-10 minutes, stopping halfway through to stir the coconut with a spatula. Cool completely before adding to most recipes. 

STOVE-TOP METHOD: Add coconut to a large nonstick skillet then heat and stir over medium heat until evenly toasted. Cool completely before adding to most recipes. 

Easy Coconut Cream Pie! A simple recipe for rich, creamy coconut pie with a mousse-like consistency using easy-to-find ingredients.

A FEW RECIPE NOTES

  1. Only use Cream of Coconut (not coconut milk or coconut cream).
  2. Feel free to top the pie with whipped cream or additional Cool Whip.
  3. If your pie isn't set after 4-6 hours, freeze for 1 hour to speed up the process.
  4. The texture isn't firm like cheesecake, it's supposed to be a little wiggly. 
  5. The filling can also be used to make 2 smaller pies using standard pie shells (not deep dish).
  6. You don't have to toast the coconut but doing so really brings out the flavor and provides great texture. See the How To section above about toasting coconut if needed.
Easy Coconut Cream Pie! A simple recipe for rich, creamy coconut pie with a mousse-like consistency using easy-to-find ingredients.

FAQ ON CREAM OF COCONUT

Can I use Coconut Milk instead of Cream of Coconut?  No, the two are not equivalent. Coconut milk is a thin, unsweetened non-dairy milk (like almond milk), whereas Cream of Coconut is thick and sweetened.

Are Cream of Coconut and Coconut Cream the same thing?  They are not. Coconut Cream is thick and spreadable like butter. It has a similar consistency to vegetable shortening.

Where can I find Cream of Coconut?  Most grocery stores stock it with cocktail mixers (tonic, bloody mary mix, sour mix, etc.) because it's a staple in Pina Coladas and other dreamy libations. Though you may find some shelved with other canned milks or with Indian and Hispanic cuisine ingredients in the grocery store, it will ALWAYS be where the cocktail mixers are.

Is Cream of Coconut supposed to be separated?  The degree to which the creamiest parts rise to the top of the can depends on temperature and how long it has been sitting still. In all such things, cream rises to the top. Shake the can vigorously before opening. If the contents are still separated, it's completely OK and normal (especially in cooler temperatures). Everything will smooth out beautifully once mixed well.

Which brand is best?  I typically use Coco Lopez or Goya.

Easy Coconut Cream Pie! A simple recipe for rich, creamy coconut pie with a mousse-like consistency using easy-to-find ingredients.

MORE COCONUT DESSERT RECIPES

COCONUT TEXAS SHEET CAKE - A velvety tender Texas sheet cake recipe made with coconut milk for a super moist texture and tons of coconut flavor. 

GOD BLESS AMERICA CAKE - An easy scratch-made cake recipe with crushed pineapple and brown sugar topped with a caramel pecan coconut icing.

COCONUT MACAROON KISSES - A tender and light, yet rich and dreamy recipe for chewy coconut cookies topped with Hershey’s Kiss chocolate 

GERMAN CHOCOLATE SHEET CAKE - An easy German Chocolate sheet cake recipe with a spiffed-up cake mix base and homemade caramel, pecan and coconut icing.

LEMON MACAROON TARTS - Light, chewy coconut macaroon tartlet shells filled with luscious, bright sweet-tart lemon curd topped with whipped cream. 

SNO BALL BROWNIES - An easy recipe for fudgy brownies, marshmallow buttercream and coconut just like the classic Hostess Sno Ball snack cakes! 

Recipe for How to Cook Easy Coconut Cream Pie

Easy Coconut Cream Pie! A simple recipe for rich, creamy coconut pie with a mousse-like consistency using easy-to-find ingredients.

Easy Coconut Cream Pie

Easy Coconut Cream Pie
Yield: 8 servings
Author: Mandy Rivers | South Your Mouth
Prep time: 15 MinInactive time: 4 HourTotal time: 4 H & 15 M

A simple recipe for rich, creamy coconut pie with a mousse-like consistency using easy-to-find ingredients.

Ingredients

  • 1 15-oz. can cream of coconut
  • 1/4 cup milk
  • 1 large (5.1 oz) box instant vanilla pudding mix
  • 1 14-oz. can sweetened condensed milk
  • 2 cups sweetened flaked coconut, toasted and divided
  • 1 8-oz tub cool whip, thawed
  • 1 deep dish pie shell

Instructions

  1. Bake and cool pie shell if using pastry-style shell. If using a ready-made (such as graham cracker) proceed to Step 2.
  2. Add cream of coconut to a stand mixer or large bowl (using a hand-held mixer) then mix on medium speed until smooth.
  3. Add milk, pudding mix and sweetened condensed milk then mix until thoroughly combined and smooth.
  4. Fold in a heaping cup of toasted coconut and cool whip then mix until just combined.
  5. Add mixture to pie shell, garnish with remaining toasted coconut then refrigerate for 4-6 hours or overnight.

Notes

  • Use any deep dish pie crust (graham cracker, ready-bake, homemade, etc.). If using a crust that requires baking, bake and cool before filling.
  • Only use Cream of Coconut (not coconut milk or coconut cream).
  • Feel free to top the pie with whipped cream or additional Cool Whip.
  • If your pie isn't set after 4-6 hours, freeze for 1 hour to speed up the process.
  • The texture isn't firm like cheesecake, it's supposed to be a little wiggly. 
  • The filling can also be used to make 2 smaller pies using standard pie shells (not deep dish).
  • You don't have to toast the coconut but doing so really brings out the flavor and provides great texture. See the How To section above the recipe card on toasting coconut if needed.


coconut, cream, pie, mile high, creamy, no bake, instant, pudding, cool whip, sweetened, condensed milk, flaked, family recipe, best, how to, easter
dessert
American
Keep up with my latest shenanigans by following South Your Mouth!


3/19/25

Nanny's Peanut Butter Cream Pie

A simple no-bake peanut butter pie recipe that's silky smooth, luxuriously rich and packed with peanut butter flavor. 

JUMP TO RECIPE

Growing up, Nanny made these peanut butter pies that were very basic, thin and understated and they were THE BEST pies ever!

Sometimes she'd top them with whipped cream but, for the most part, she just served them plain and that's how we liked them best because we'd just pick the whole slice up and eat it like pizza.

The texture is firm enough to mostly hold its shape but we'd still be licking peanut butter cream from our fingers like little puppies.

Nanny's Peanut Butter Cream Pie! A simple no-bake peanut butter pie recipe that's silky smooth, luxuriously rich and packed with peanut butter flavor.

INGREDIENTS FOR NANNY'S PEANUT BUTTER CREAM PIE

This pie is super simple and uses common ingredients easy to find! All you need to make these pies is:

  • Cream cheese
  • Sweetened condensed milk
  • Peanut butter
  • Powdered sugar
  • Cool whip
  • Chocolate pie crusts
Nanny's Peanut Butter Cream Pie! A simple no-bake peanut butter pie recipe that's silky smooth, luxuriously rich and packed with peanut butter flavor.

Nanny didn't make hers with chocolate graham cracker crusts because there wasn't any such thing back then. I don't actually remember what sort of crust she used. Her recipe card just reads to "fill two shallow pie pastries".

You can use whichever crusts you like best but I definitely prefer the little bit of chocolate with the peanut butter. Regular graham cracker crusts are great too, though!

If you use pastry pie shells, just be sure to cook and completely cool them before adding the filling.

Nanny's Peanut Butter Cream Pie! A simple no-bake peanut butter pie recipe that's silky smooth, luxuriously rich and packed with peanut butter flavor.

NOTES ON MAKING NANNY'S PEANUT BUTTER CREAM PIE

  1. Feel free to top the pie with whipped cream or additional Cool Whip.
  2. Garnish with chocolate sauce or chopped peanuts if desired. 
  3. I've never made this with crunchy peanut butter but I imagine it would work just fine.
  4. Use traditional peanut butter. Homemade and other nut butters are too thin to work with this recipe.
  5. If your pie isn't set after 4-6 hours, freeze for 1 hour to speed up the process.
  6. The texture isn't firm like cheesecake, it's supposed to be little wiggly. 
Nanny's Peanut Butter Cream Pie! A simple no-bake peanut butter pie recipe that's silky smooth, luxuriously rich and packed with peanut butter flavor.

MORE NO-BAKE DESSERTS I LOVE!

Chocolate Nutter Butter Icebox Cake - A chocolate layered dessert with peanut butter cookies, whipped cream and peanut butter drizzle like a chocolate peanut butter lasagna! 

Black Forest Oreo Dessert - A decadent no-bake icebox dessert recipe layered with Oreo cookies, chocolate pudding and cherry pie.

Nutter Butter Banana Pudding with Peanut Butter Ripples - A banana pudding recipe made with Nutter Butter cookies, bananas, vanilla pudding and layers of peanut butter ripples.

Italian Bakeless Cake - A layered dessert with pineapple, vanilla wafers, cool whip, coconut and cherries. 

Paula Deen's Banana Pudding - The iconic recipe made with cream cheese and butter shortbread cookies that's Not Yo' Mama's Banana Pudding!

Recipe for Nanny's Peanut Butter Cream Pie

Nanny's Peanut Butter Cream Pie! A simple no-bake peanut butter pie recipe that's silky smooth, luxuriously rich and packed with peanut butter flavor.

Nanny's Peanut Butter Cream Pie

Nanny's Peanut Butter Cream Pie
Yield: 2 Pies
Author: Mandy Rivers | South Your Mouth
Prep time: 10 MinInactive time: 2 HourTotal time: 2 H & 10 M

A simple no-bake peanut butter pie recipe that's silky smooth, luxuriously rich and packed with peanut butter flavor.

Ingredients

  • 1 8-oz block cream cheese, at room temperature
  • 1 14-oz can sweetened condensed milk
  • 1 cup peanut butter
  • 1 cup powdered sugar
  • 1 8-oz carton cool whip, thawed
  • 2 chocolate graham cracker pie crusts

Instructions

  1. Whip cream cheese with an electric mixer until smooth. 8-oz cream cheese
  2. Add sweetened condensed milk, peanut butter and powdered sugar then mix until well combined. 1 can condensed milk, 1 c. peanut butter, 1 c. powdered sugar
  3. Add half of cool whip then mix until smooth.
  4. Fold in remaining cool whip then mix until just combined.
  5. Spoon mixture evenly into pie crusts then refrigerate 4-6 hours or overnight.

Notes

  • Feel free to top the pie with whipped cream or additional Cool Whip.
  • Garnish with chocolate sauce or chopped peanuts if desired. 
  • I've never made this with crunchy peanut butter but I imagine it would work just fine.
  • Use traditional peanut butter. Homemade and other nut butters are too thin to work with this recipe.
  • If your pie isn't set after 4-6 hours, freeze for 1 hour to speed up the process.
  • The texture isn't firm like cheesecake, it's supposed to be little wiggly. 
peanut butter, cream, pie, sweetened condensed milk, cream cheese, powdered sugar, no-bake, easy, best, rich, cheesecake, recipe, nanny's, old fashioned, amish, family
dessert
American
Keep up with my latest shenanigans by following South Your Mouth!


12/11/23

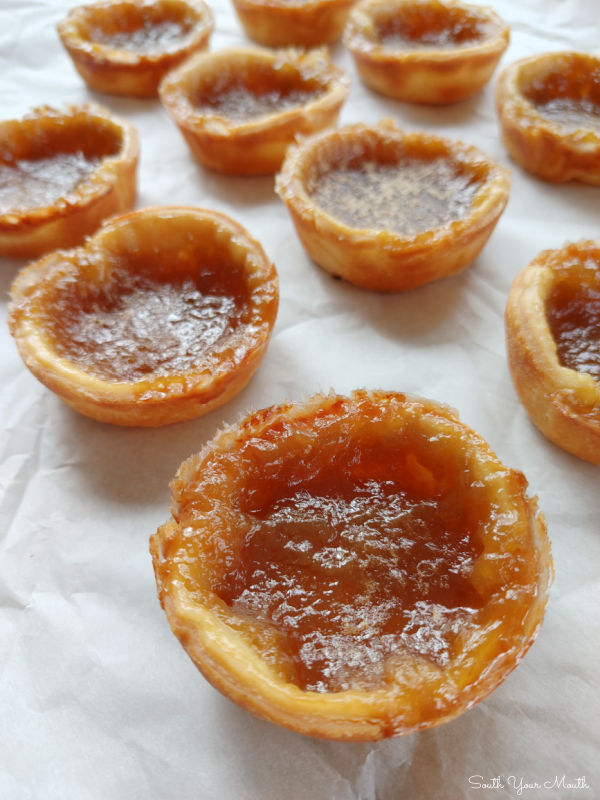
Short-Cut Butter Tarts

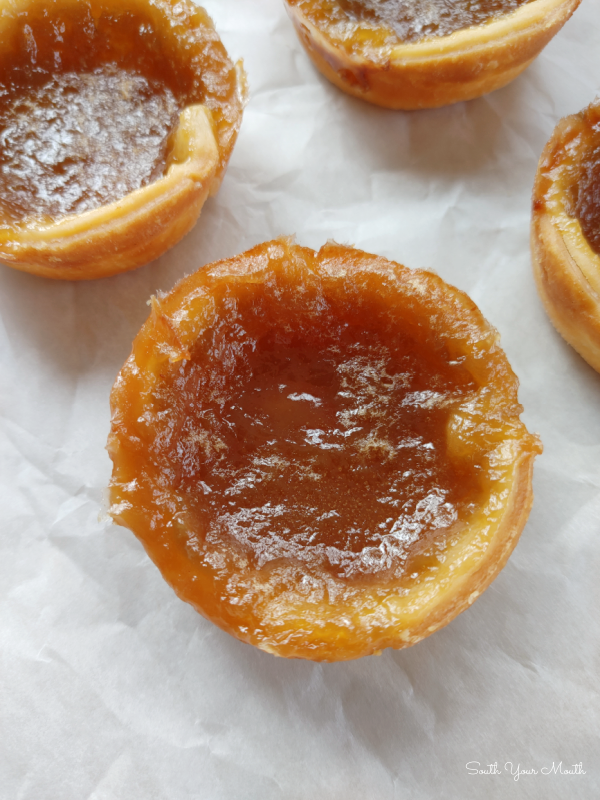
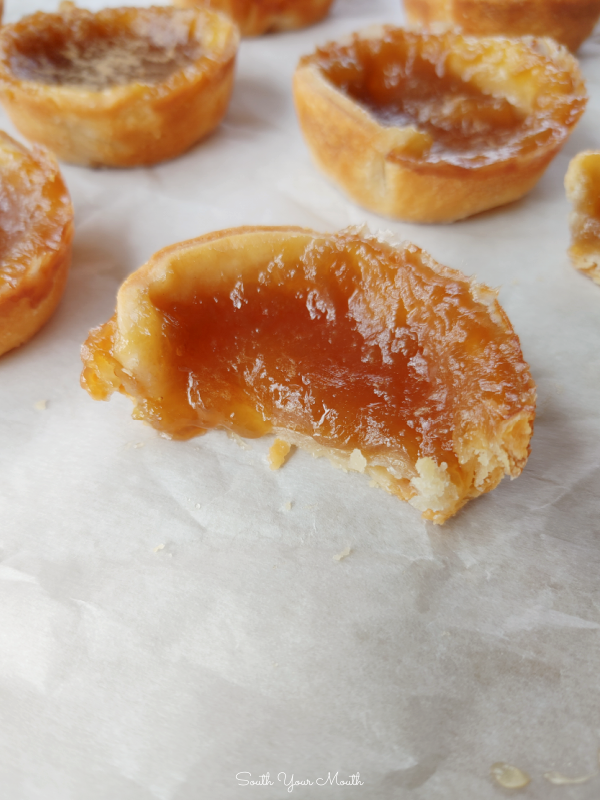
Canada’s famous butter tarts filled with that signature drippy, gooey, buttery syrup made easier with refrigerated pie crust pastry dough.

TABLE OF CONTENTS:

  1. JUMP TO THE RECIPE
  2. WHAT ARE BUTTER TARTS?
  3. NOTES ABOUT THIS RECIPE
  4. COOKING TIPS FOR BUTTER TARTS

If you’ve ever been to Canada, you’ve likely seen Butter Tarts. If you were in Ontario, you definitely saw them. If you’re lucky, you ate at least a dozen.

Butter Tarts are a huge part of Canadian dessert cuisine, particularly in the provinces of central Canada. They are a matter of pride there the same way pulled pork is here in the South, chowder is in the Northeast and fried catfish is in Texas.

They have festivals. They have tours (like wine trails). They put them on their postage stamps once. I’ve seen them at the counter in gas stations.

Short-Cut Butter Tarts! Canada’s famous butter tarts filled with that signature drippy, gooey, buttery syrup made easier with refrigerated pie pastry dough.

WHAT ARE BUTTER TARTS?

Butter Tarts are Canadian pastry cups made by shaping tiny tart crusts in a muffin tin, filled with a mixture made from butter, brown sugar, syrup, vanilla and egg. The filling is much like a pecan pie but looser. The filling is intended to run and drip a little when the tart is bitten into.

The syrup used in the filling can be corn syrup or maple syrup, though the recipe will vary slightly between the two as maple syrup is thinner than corn syrup (thus more/less of other ingredients will be used to maintain the right consistency.

Butter tarts are most commonly made plain but can be made with raisins and/or nuts too. 

Short-Cut Butter Tarts! Canada’s famous butter tarts filled with that signature drippy, gooey, buttery syrup made easier with refrigerated pie pastry dough.

NOTES ABOUT THIS RECIPE

Traditional Butter Tarts have a slightly thicker pastry crust than the prepared crust used in this recipe.

Whether to use light or dark corn syrup and brown sugar is up to you and somewhat of debate among veteran bakers and connoisseurs. My mother-in-law (born and bred in Ontario between Kingston and Belleville) uses light corn syrup and dark brown sugar but assures me that any of these will work.

Feel free to add a few raisins to the tarts before adding the filling if desired. I actually add a few chocolate chips to half of mine, but Husband usually blesses himself and mutters something under his breath when I do, so I imagine that is taboo in Canada.

Husband’s family actually calls these Taffy Tarts but none of them can tell me why. I thought it was a family thing but have gotten a few hits online saying they are occasionally called this. I haven’t been able to confirm there is any variation in the recipe.

Short-Cut Butter Tarts! Canada’s famous butter tarts filled with that signature drippy, gooey, buttery syrup made easier with refrigerated pie pastry dough.

COOKING TIPS FOR THE BEST BUTTER TARTS

You can’t bake these in a traditional 8-inch or 9-inch pie shell. The filling is too loose.

The filling is best when all ingredients are at room temperature. Melted butter mixes into the filling much better than room temperature but you don’t want it to be hot. If you melt the butter before preheating the oven and prepping the pastry crusts, the temperature should be perfect.

These bake best on the bottom rack of the oven. 

These suckers stick to the pan if you don’t take care to properly grease the tins. I use non-stick pans and brush them with homemade pan release (equal parts shortening, flour and vegetable oil), taking care to brush the sides liberally.

Short-Cut Butter Tarts! Canada’s famous butter tarts filled with that signature drippy, gooey, buttery syrup made easier with refrigerated pie pastry dough.

It is MUCH EASIER to fill the cups with the thin filling if you can pour it in instead of trying to spoon it. I have an old plastic 8-cup measuring pitcher that works perfectly for this. I love that thing and would likely grab it before my jewelry box if the house ever caught on fire.

It is important to mix the filling occasionally when pouring it into the prepared crusts as the sugar will settle to the bottom.

You can add pecans or walnuts to the filling but I never have because that’s just a little too close to Pecan Pie for me.

Short-Cut Butter Tarts! Canada’s famous butter tarts filled with that signature drippy, gooey, buttery syrup made easier with refrigerated pie pastry dough.

OTHER OLD-FASHIONED SWEET TREATS

RAISIN CAKE - A vintage Depression-Era snack cake made with raisins, molasses and cozy spices without any eggs, milk or butter that’s super moist and perfectly sweet. 

JIM JAM COOKIES - An old-fashioned heirloom cookie recipe for molasses cookie sandwiches filled with raspberry jam. 

LEMON MACAROON TARTS - Light, chewy coconut macaroon tartlet shells filled with luscious, bright sweet-tart lemon curd topped with whipped cream. 

BLACK BOTTOM CUPCAKES - Chocolate cupcakes stuffed with chocolate chip cream cheese filling. Very much like a cupcake stuffed with cheesecake!

Recipe for Short-Cut Butter Tarts

Short-Cut Butter Tarts! Canada’s famous butter tarts filled with that signature drippy, gooey, buttery syrup made easier with refrigerated pie pastry dough.

Short-Cut Butter Tarts

Short-Cut Butter Tarts
Yield: 12 Tarts
Author: Mandy Rivers | South Your Mouth
Prep time: 20 MinCook time: 12 MinTotal time: 32 Min
Canada’s famous butter tarts filled with that signature drippy, gooey, buttery syrup made easy with refrigerated pie pastry dough.

Ingredients

  • 1/2 cup packed brown sugar
  • 1/2 cup corn syrup
  • 1/4 cup real butter, melted and cooled
  • 1 egg, room temperature
  • 1.5 teaspoons vanilla extract
  • 1/4 teaspoon salt
  • 2 refrigerated pie crust pastries

Instructions

  1. Preheat oven to 400 degrees. Set pie pastries out to come to room temperature. Melt butter then allow it to cool a little before mixing.
  2. Combine brown sugar, corn syrup, butter, egg, vanilla and salt in a large measuring pitcher then mix very well; set aside.
  3. Grease a standard-size non-stick muffin tin (12 serving-size) with baking spray (flour/oil combo), brush with melted butter or brush with pan release (equal parts shortening, oil and flour).
  4. Unroll pie dough pastries. Do NOT roll out or flatten the dough. Using a large biscuit cutter or drinking glass (something about 4” in diameter or wide enough to create tarts about 1-inch deep), cut circles from the dough then fit them into each muffin cup, gently pressing into the bottom and up the sides. Gather dough scraps into a ball then roll out if needed to make all 12 circles.
  5. Stir filling well again then pour into tarts, filling each 2/3 full. Do not overfill. If you have extra filling, roll dough scraps out to make more tarts if desired.
  6. Bake on bottom shelf of oven at 400 degrees for 12-15 minutes or until crust is light brown and filling is mostly set (some jiggle is OK).
  7. Cool for 10 minutes then gently run a thin knife around edges of each tart to remove.

Notes

  • I use Pillsbury refrigerated pie crusts for this recipe.
  • Use light or dark brown sugar and corn syrup.
  • Add raisins, nuts or chocolate chips to tarts before filling if desired.
  • See sections in post above for more Notes and Tips.
easy, shortcut, refrigerated pie dough, pastry, pillsbury, canada, canadian, taffy tarts, butter tarts, mini, pie, drippy, gooey, runny, best, how to
dessert
Canadian
Keep up with my latest shenanigans by following South Your Mouth!


5/04/22

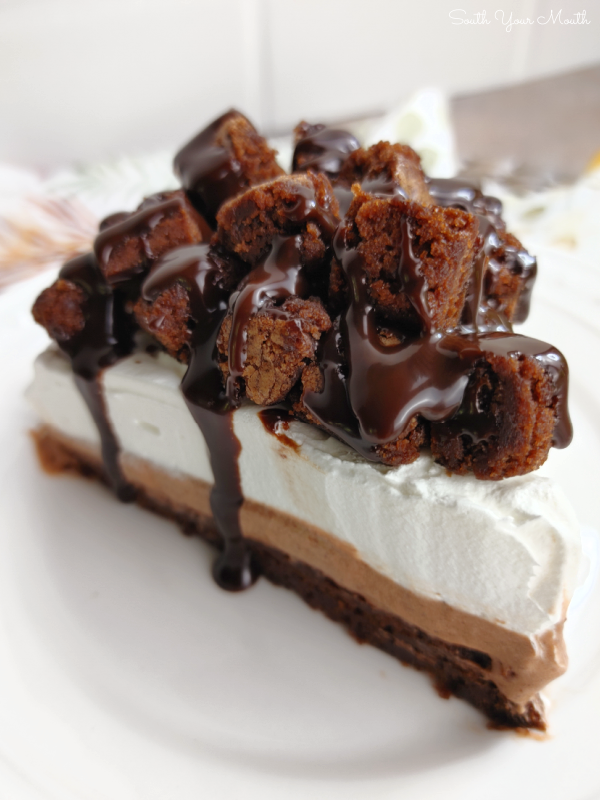
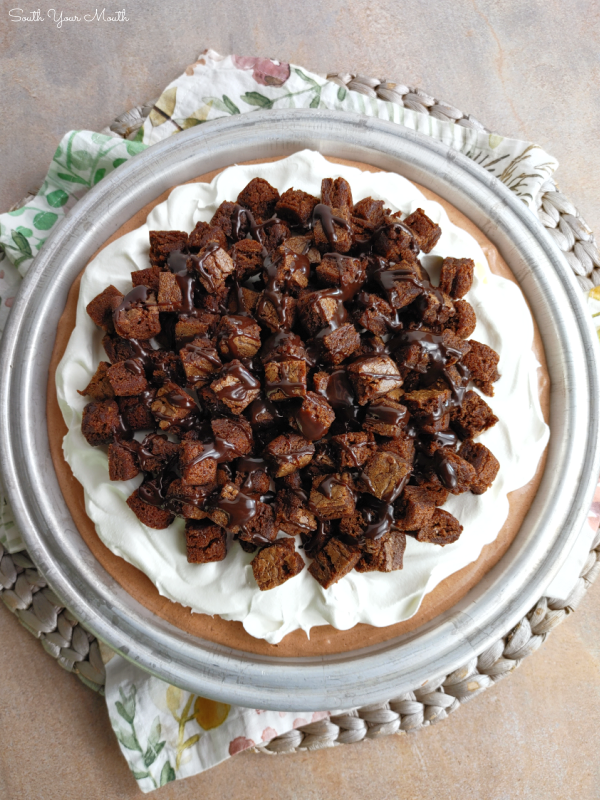
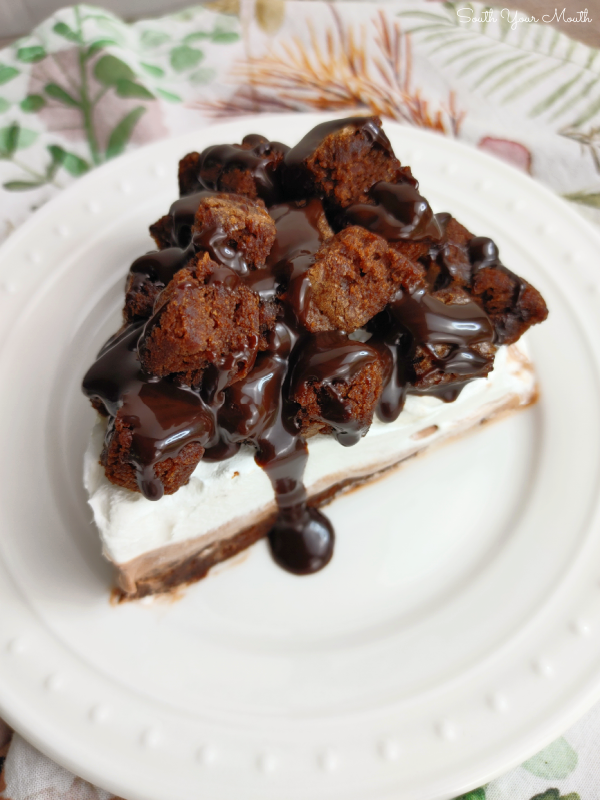
Triple Chocolate Brownie Cream Pie

Cream cheese, pudding mix, marshmallow crème and cool whip make a mousse-like chocolate filling in this brownie-bottom super simple, but luxurious dessert recipe!

JUMP TO RECIPE

If you want to make an impressive dessert that looks like something from a fancy bakery but don’t want to spend all day on it, this is the pie for you!

I mean, LOOK at this thing! And not only does it look amazing, it tastes like a million bucks!

This is impressive enough for a swanky dinner party and easy enough to make any ol' time you want!

Triple Chocolate Brownie Cream Pie! Cream cheese, pudding mix, marshmallow crème and cool whip make a mousse-like chocolate filling in this brownie-bottom super simple, but luxurious dessert recipe!

There are two things about this pie that make it extraordinary and unique. One is the brownie bottom (and of course bonus brownie chunks on top) and the other is the chocolate filling.

The chocolate filling is made with marshmallow cream which gives it this luxurious texture somewhere between mousse and swiss meringue.

This pie is like a perfect storm of dessert textures... fluffy, creamy, chewy and silky... in every single bite! It's the perfect balance. And did I mention, it's EASY?!

Triple Chocolate Brownie Cream Pie! Cream cheese, pudding mix, marshmallow crème and cool whip make a mousse-like chocolate filling in this brownie-bottom super simple, but luxurious dessert recipe!

ALL YOU NEED TO MAKE TRIPLE CHOCOLATE BROWNIE CREAM PIE

  • Brownie Mix
  • Cream Cheese
  • Instant Chocolate Pudding
  • Marshmallow Crème
  • Cool Whip
  • Chocolate Sauce (like Hershey's)

Triple Chocolate Brownie Cream Pie! Cream cheese, pudding mix, marshmallow crème and cool whip make a mousse-like chocolate filling in this brownie-bottom super simple, but luxurious dessert recipe!

HOW TO MAKE TRIPLE CHOCOLATE BROWNIE CREAM PIE

  1. Bake the brownie mix; half in a deep-dish pie pan and half in any 8 or 9-inch pan, then cool.
  2. Combine filling ingredients then pour into pie pan over brownie bottom.
  3. Top filling with Cool Whip.
  4. Cut remaining brownies into chunks then pile on top.
  5. Drizzle with chocolate sauce.
  6. BOOM! DONE!

Triple Chocolate Brownie Cream Pie! Cream cheese, pudding mix, marshmallow crème and cool whip make a mousse-like chocolate filling in this brownie-bottom super simple, but luxurious dessert recipe!

A FEW NOTES ABOUT MAKING THIS RECIPE

  • Any 18-20 ounce box of brownie mix will work. I prefer the plain variety in this recipe over anything with chocolate chunks or caramel.
  • The cream cheese needs to be completely soft to avoid lumps. If the cream cheese isn’t smooth after beating, just leave it to set out a little longer then try again.
  • To easily spoon the marshmallow cream from the jar, first remove the lid and seal then microwave for 20-25 seconds.
  • Use any brand 4-serving size box instant pudding in this recipe (around 4 ounces). 
  • If it’s easier for you, feel free to use two 8-oz tubs of Cool Whip. You’ll use one (divided) in the chocolate filling then top the pie with the remaining tub.
  • Light versions of all of these ingredients are great in this! I actually prefer the 1/3 less fat cream cheese (neufchatel cheese) in this recipe. Light Cool Whip and sugar-free pudding mix are great alternatives too.

Triple Chocolate Brownie Cream Pie! Cream cheese, pudding mix, marshmallow crème and cool whip make a mousse-like chocolate filling in this brownie-bottom super simple, but luxurious dessert recipe!

PRO TIP!! Spooning marshmallow cream from the jar can be a chore because it sticks to the sides like crazy. A trick for getting it out of the jar more easily is to remove the lid and seal then microwave for 20-25 seconds just before you’re ready to spoon it out. 

Triple Chocolate Brownie Cream Pie! Cream cheese, pudding mix, marshmallow crème and cool whip make a mousse-like chocolate filling in this brownie-bottom super simple, but luxurious dessert recipe!

Recipe for Triple Chocolate Brownie Cream Pie

Triple Chocolate Brownie Cream Pie

Triple Chocolate Brownie Cream Pie
Yield: 8 Servings
Author: Mandy Rivers | South Your Mouth
Prep time: 10 MinCook time: 20 MinInactive time: 4 HourTotal time: 4 H & 30 M
Cream cheese, pudding mix, marshmallow crème and cool whip make a mousse-like chocolate filling in this brownie-bottom super simple, but luxurious dessert recipe!

Ingredients

  • 1 18-oz family size brownie mix
  • Eggs, oil & water per brownie instructions
  • 1 8-oz block cream cheese, at room temperature
  • 1 16-oz tub Cool Whip, thawed
  • 1 3.9-oz box instant chocolate pudding mix
  • 1 7-oz jar marshmallow crème
  • 1/4 cup chocolate sauce (like Hershey’s)

Instructions

  1. Preheat oven for brownies. Spray one deep-dish pie pan and one 8-9” square pan (round is fine too) with cooking spray.
  2. Prepare brownie mix per manufacturer’s instructions. Divide batter evenly into prepared pans then bake for twenty minutes or until done. Cool brownies in pans completely.
  3. Beat cream cheese in a large bowl until completely smooth with an electric mixer.
  4. Add about 1/4 of the tub of Cool Whip and instant pudding mix then beat until mixed well.
  5. Add marshmallow cream then mix until smooth and completely incorporated.
  6. Mix in another 1/4 of the tub of Cool Whip (half of the tub should still be remaining) then blend until no white streaks remain.
  7. Pour filling over brownie bottom in the deep-dish pie pan then freeze for at least 4-6 hours.
  8. Cut brownies from square pan into small cubes. Top pie with remaining Cool Whip then arrange brownie pieces on top.
  9. Drizzle with chocolate syrup then refrigerate to store.

Notes

  • Any 18-20 ounce box of brownie mix will work. I prefer the plain variety in this recipe over anything with chocolate pieces or nuts.
  • The cream cheese needs to be completely soft to avoid lumps. If the cream cheese isn’t smooth after beating, just leave it to set out a little longer then try again.
  • You can absolutely make this a day or two in advance. It will keep beautifully.
  • To easily spoon the marshmallow cream from the jar, first remove the lid and seal then microwave for 20-25 seconds.
  • Use any brand 4-serving size box instant pudding in this recipe (around 4 ounces). 
  • If it’s easier for you, feel free to use two 8-oz tubs of Cool Whip. You’ll use one (divided) in the chocolate filling then top the pie with the remaining tub.
  • Light versions of all of these ingredients are great in this! I actually prefer the 1/3 less fat cream cheese (neufchatel cheese) in this recipe. Light Cool Whip and sugar-free pudding mix are great alternatives too.
brownie, bottom, chunk, pieces, whipped, pie, dessert, instant pudding, mix, cool whip, marshmallow, creme, cream, hershey's, cream cheese, cheesecake, layered, easy, best, how to, recipe
dessert, pie
Keep up with my latest shenanigans by following South Your Mouth!