With everything from patriotic favorites to cherished
family recipes, this collection of no-bake desserts has something for every occasion.
Each link will take you to a printable recipe with plenty of photos so you can
see which one you'd like to try first!
1. Red, White & Blue Cheesecake Salad
- This berry cheesecake salad recipe is the perfect patriotic dessert for
Memorial Day and 4th of July with strawberries, blueberries and cream cheese
filling.
2. Chocolate Nutter Butter Icebox Cake
- A layered dessert recipe with chocolate pudding, peanut butter cookies,
whipped cream and peanut butter drizzle like a chocolate peanut butter
lasagna!
3. Strawberry Cheesecake Lasagna - A show-stopping no-bake dessert recipe with graham crackers layered between an easy cheesecake filling and fresh strawberries.
4. Easy Southern Banana Pudding
- A quick and easy recipe for banana pudding using instant vanilla pudding and
whipped topping you can whip up without turning on the stove.
5. Paula Deen’s Banana Pudding
- An iconic recipe using Chessmen cookies, cream cheese and sweetened
condensed milk that's a new classic for a reason - it's insanely
delicious!
6. Strawberry Shortcake Dessert
- An easy recipe for a Strawberry Shortcake layered dessert made in a 13x9
dish perfect for potluck dinners, cookouts or family gatherings!
7. Italian Bakeless Cake
- A layered dessert with vanilla wafers and creamy
pineapple “pudding” made with sweetened condensed milk and lemon juice topped
with cool whip, coconut, cherries and pecans.
8. Fried Ice Cream Cake Dessert
- An easy, unique frozen dessert recipe with whipped vanilla ice cream layered
between crunchy, buttery crushed cornflakes that's JUST like Mexican fried ice
cream.
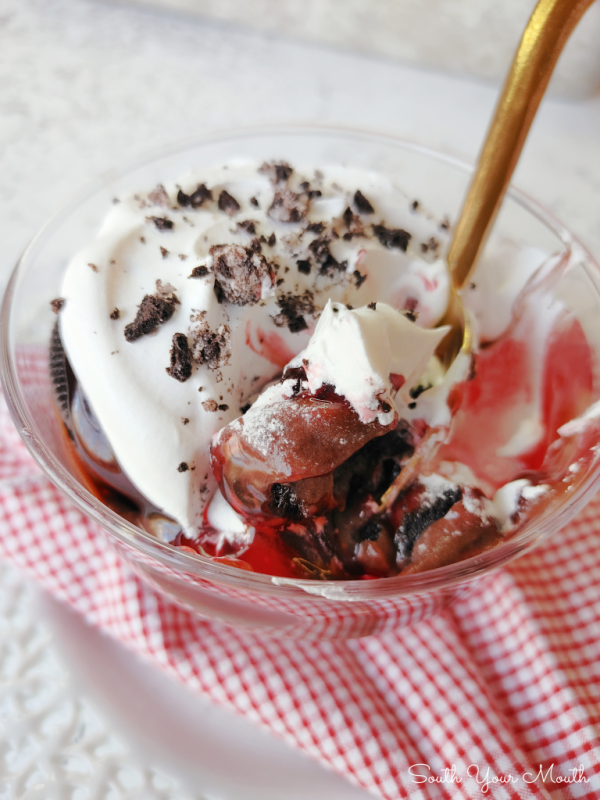
9. Black Forest Oreo Dessert
- A decadent no-bake icebox dessert layered with Oreo cookies, chocolate
pudding and cherry pie filling that's super quick and easy to make!
10. Nutter Butter Banana Pudding
- A banana pudding recipe made with Nutter Butter cookies, bananas, vanilla
pudding and layers of peanut butter ripples for the perfect no-bake icebox
dessert!
A simple no-bake peanut butter pie recipe that's silky smooth, luxuriously
rich and packed with peanut butter flavor.
Updated 5/27/26
Growing up, Nanny made these peanut butter pies that were very basic, thin and
understated and they were THE BEST pies ever!
Sometimes she'd top them with whipped cream but, for the most part, she just
served them plain and that's how we liked them best because we'd just pick the
whole slice up and eat it like pizza.
The texture is firm enough to mostly hold its shape but we'd still be licking
peanut butter cream from our fingers like little puppies.
INGREDIENTS FOR NANNY'S PEANUT BUTTER CREAM PIE
This pie is super simple and uses common ingredients easy to find! All you
need to make these pies is:
Cream cheese
Sweetened condensed milk
Peanut butter
Powdered sugar
Cool whip
Chocolate pie crusts
Nanny didn't make hers with chocolate graham cracker crusts because there
wasn't any such thing back then. I don't actually remember what sort of crust
she used. Her recipe card just reads to "fill two shallow pie pastries".
You can use whichever crusts you like best but I definitely prefer the little
bit of chocolate with the peanut butter. Regular graham cracker crusts are
great too, though!
If you use pastry pie shells, just be sure to cook and completely cool them
before adding the filling.
NOTES ON MAKING NANNY'S PEANUT BUTTER CREAM PIE
Feel free to top the pie with whipped cream or additional Cool Whip.
Garnish with chocolate sauce or chopped peanuts if desired.
I've never made this with crunchy peanut butter but I imagine it would work
just fine.
Use traditional peanut butter. Homemade and other nut butters are too thin
to work with this recipe.
If your pie isn't set after 4-6 hours, freeze for 1 hour to speed up the
process.
The texture isn't firm like cheesecake, it's supposed to be little
wiggly.
LOOKING FOR MORE NO-BAKE DESSERT RECIPES?
If easy dessert recipes are your favorite kind, pop over to my collection of Easy No-Bake Desserts and take a look around! There's something for everyone with everything from chocolate to fruit to peanut butter!
Recipe for Nanny's Peanut Butter Cream Pie
Nanny's Peanut Butter Cream Pie
Yield: 2 Pies
Author: Mandy Rivers
Prep time: 10 MinInactive time: 2 HourTotal time: 2 H & 10 M
A simple no-bake peanut butter pie recipe that's silky smooth, luxuriously rich and packed with peanut butter flavor.
Ingredients
1 8-oz block cream cheese, at room temperature
1 14-oz can sweetened condensed milk
1 cup peanut butter
1 cup powdered sugar
1 8-oz carton cool whip, thawed
2 chocolate graham cracker pie crusts
Instructions
Whip cream cheese with an electric mixer until smooth. 8-oz cream cheese
Add sweetened condensed milk, peanut butter and powdered sugar then mix until well combined. 1 can condensed milk, 1 c. peanut butter, 1 c. powdered sugar
Add half of cool whip then mix until smooth.
Fold in remaining cool whip then mix until just combined.
Spoon mixture evenly into pie crusts then refrigerate 4-6 hours or overnight.
Notes
Use traditional peanut butter. Homemade and other nut butters are too thin to work with this recipe.
If your pie isn't set after 4-6 hours, freeze for 1 hour to speed up the process.
See article above the recipe card for more notes and tips!
The easiest recipe for elevated rice krispies that are chewy
and crispy, packed with buttery caramel and warm vanilla flavor that’s
highlighted by the perfect amount of salt.
Take everything you know about Rice Krispy Treats and throw it out the window.
Because these bad boys are unlike any you’ve ever had before.
And I PROMISE you will never make them the other way again.
One simple addition and some extra marshmallows transform regular Rice Krispy
Treats into a chewy, crispy, perfectly sweet goody with more flavor than you
knew a Rice Krispy Treat could have!
I can’t decide if it’s the texture I’m hooked on or the flavors. Well, it’s
both, I suppose.
When you bite into one of these you get the crunch you’re used to but then you
get this indulgent chewiness that’s unexpectedly decadent. And when you put
those two together?? It hits on a whole other level.
And the flavor?! “Salted caramel” is a thing for a reason – the combo is
perfect. The warm, sweet, buttery taste is amplified by the salt. And then
we’re hitting this with vanilla too? Man, DANG!
Recipes for most other Salted Caramel Rice Krispy Treats require you to make
caramel (or something similar) on the stove. Overcook it and you’ve got a
problem, undercook it and you’ve got a mess.
Ummm… no. Part of what makes RKT so great is that they’re quick and
easy! With this recipe, you just add caramel candies to the marshmallows when
you melt them with the butter, et voila!
Add some vanilla extract and salt and BOOM, you’ve got a completely elevated
sweet treat with no more effort. Well, you do have to unwrap the caramels but
if you get the brand I suggest, that’s easy-peasy too!
INGREDIENTS FOR EASY SALTED CARAMEL RICE KRISPIES TREATS
With just a few simple extra ingredients (and zero extra work) regular RKT are
completely transformed both in flavor and in texture. Here's all you need:
Crispy rice cereal
Marshmallows (2 bags)
Butter
Caramel candies (Kraft or Werther’s)
Salt
Vanilla extract
7 FAQ ON EASY SALTED CARAMEL RICE KRISPIES TREATS
WHAT TYPE OF CARAMEL DO I USE? I prefer Werther’s Original Chewy Caramels (found on the candy
aisle). You can also use Kraft Baking Caramels or Kraft Caramel Bits (found
on the baking aisle). All 3 come in 11-oz packages which is how much you
need.
The wrapped caramels are best, in my opinion. I opt for the Werther’s
because they are SUPER EASY to unwrap whereas unwrapping a whole bag of
Kraft Caramels makes me feel like I might have a stroke or a panic attack.
DO I REALLY NEED TWO BAGS OF MARSHMALLOWS? Yes. We’re going to use 3 cups to mix in separate which is what
gives us those gorgeous whole pieces. Also, because we’re adding chewy
caramel, we need a little more marshmallow softness to keep everything from
setting up too hard.
SALTED OR UNSALTED BUTTER? Either is fine. You’re
supposed to be able to taste the salt in these, though if you’re sensitive
to salt, use unsalted butter. I have never bought unsalted butter in my life
and always use the full amount of salt in recipes.
SHOULDN’T YOU USE KOSHER OR COARSE-GRAIN SALT? You only benefit from using flaky or large-grain salt in desserts
when the salt is added toward the end of preparation and the grains are left
intact. The salt is dissolved into the marshmallow/caramel mixture in this
recipe so there’s really no point.
WHAT SIZE BOX OF CEREAL DO I NEED TO YIELD 8 CUPS? The
standard, smaller size box has more than enough for 8 cups. You won’t need
to buy the family size. Don’t try to use the whole box. I have (because I
didn’t want them to go to waste) and it does NOT work.
WHY DON’T I PACK THE TREATS FIRMLY INTO THE PAN? Packing
RKT into the pan makes them hard. This is true for the regular recipe but
especially true with these. Just dump it in the pan then spread to the
corners with a rubber spatula and leave it be.
DO I HAVE TO BUTTER THE PAN? You will need to treat the
pan with something or these will stick like crazy. Butter is best. The
easiest way to butter the pan is to grab a 3-tablespoon chunk of
room-temperature butter with a clean paper towel then grease the pan,
holding the butter with the paper towel. Cooking spray works but always
skeeves me out a little thinking about the oil coating the treats. I line my
pan with wax paper then butter the bottom only – this makes it easy to lift
the whole slab out of the pan to cut.
Recipe for Easy Salted Caramel Rice Krispies Treats
Easy Salted Caramel Rice Krispy Treats
Yield: 24 Servings
Author: Mandy Rivers | South Your Mouth
Prep time: 10 MinCook time: 10 MinTotal time: 20 Min
The easiest recipe for elevated rice krispies that are chewy and crispy, packed with buttery caramel and warm vanilla flavor that’s highlighted by the perfect amount of salt.
Ingredients
8 cups crispy rice cereal
1/2 cup butter
1 11-oz bag caramels
1 teaspoon vanilla extract
1 teaspoon salt (see notes)
2 10-oz bags mini marshmallows, divided
Instructions
Prepare a 13x9 baking pan by rubbing with butter. See last note in FAQ above for tips and suggestions.
Unwrap caramels then set aside.
Add rice cereal and 3 cups of marshmallows to a large mixing bowl; stir then set aside.
Melt butter over medium heat in a large non-stick pan. Non-stick is ideal when making any RKT but a regular pot will work too.
Add remaining marshmallows, unwrapped caramels, vanilla extract and salt to melted butter then cook and stir over medium-low heat until all marshmallows and caramels are melted. Don’t crank up the heat or let this cook longer than needed or the caramel could start to harden.
Pour marshmallow mixture over rice cereal then gently fold and stir with a rubber spatula until well combined.
Spread mixture into prepared 13x9 pan, taking care not to compress the mixture too much. The airier these are, the better.
Cool to room temperature then cut into squares. Store at room temperature up to 1 week.
Notes
Use Werther’s Original Chewy Caramels, Kraft Baking Caramels or Kraft Caramel Bits. See more details in FAQ above recipe card.
I use salted butter AND a full teaspoon of salt and think the saltiness is spot-on perfect with the sweet caramel and marshmallows. You’re supposed to taste the salt in “salted caramel” desserts. If you are sensitive to salt, reduce to 1/2 teaspoon and/or use unsalted butter.
Home » Desserts » Peanut Butter Chocolate Frito Munch
A quick 4-ingredient sweet and salty recipe of Fritos corn chips and chocolate
morsels covered in white chocolate and peanut butter then cooled into a candy
bark.
When the kids were little, one of their favorite treats was a snack mix I made
with Fritos corn chips, chocolate chips and peanut butter morsels (or
sometimes Reese’s Pieces).
That morphed into a more complicated version where I’d scoop peanut butter on
one end of the corn chip then dip it into melted chocolate.
They were reminiscing about it the other day and asked me why I never made it
anymore (and hint-hint you should make it again).
I picked up some Fritos and decided to surprise them with it. Then I
remembered what a pain it was because I’d have to handle every frito
individually, freeze them so the peanut butter wouldn’t melt into the
chocolate then dip them all.
Ain’t nobody got time for that.
Instead I just dumped the bag on a sheet pan, covered them with chocolate
chips, then melted white chocolate chips and peanut butter together and
swirled it all over everything.
It wasn’t the most gorgeous thing I’d ever made but it was a HIT! Once the
concoction set up, I broke it into smaller clusters like I’d do with my White Chocolate Trash.
We blew through that first batch before the sun went down that day.
Everybody was still talking about it the next day (and hint-hint you should
make it again) so I decided to make more then take pictures so I could share
it with y’all.
This would be awesome with Reese’s Pieces sprinkled over the top.
Do they make minis? Because that would be even better! Especially at
Halloween!
INGREDIENTS FOR PEANUT BUTTER CHOCOLATE FRITO MUNCH
Fritos corn chips
Semi-sweet chocolate chips
White chocolate chips
Peanut butter
MORE EASY NO-BAKE MUNCHIES!
AVALANCHE BOMBS
- An easy recipe that’s somewhere between rice krispy treats and peanut butter
fudge made with almond bark, peanut butter, crispy rice cereal, marshmallows
and mini chocolate chips.
WHITE CHOCOLATE TRASH
- Also called Christmas Crack, this sweet and salty snack mix made with chex
cereal, pretzels, peanuts, M&M’s and white chocolate is the perfect
treat!
BUTTERSCOTCH HAYSTACKS
- Crunchy chow mein noodles and salty peanuts covered in buttery, sweet
butterscotch. These eat a lot like chocolate covered pretzels with a perfect
combo of salty and sweet!
Recipe for Peanut Butter Chocolate Frito Munch
Peanut Butter Chocolate Frito Munch
Yield: 8 Cups
Author: Mandy Rivers | South Your Mouth
Prep time: 15 MinTotal time: 15 Min
A quick 4-ingredient sweet and salty recipe of Fritos corn chips and chocolate morsels covered in white chocolate and peanut butter then cooled into a candy bark.
Ingredients
1 15-oz bag Fritos corn chips
1 12-oz bag semi-sweet chocolate chips
1 12-oz bag white chocolate chips
1/4 cup peanut butter
Instructions
Line a large baking sheet with wax paper or aluminum foil then spread corn chips evenly in the pan.
Setting 1/4 cup aside to use later, sprinkle chocolate chips evenly over corn chips.
Melt white chocolate chips and peanut butter together in the microwave, stopping and stirring every 30 seconds. Take care not to overheat as the white chocolate will “seize up” if heated too long.
Drizzle white chocolate mixture evenly over corn chips and chocolate chips. Working quickly before the white chocolate cools, use a rubber spatula to gently stir everything around a bit to better coat all the chips and to swirl the chocolate chips into the white chocolate a little.
Sprinkle on remaining chocolate chips then allow everything to cool until firm.
Once firm, break mixture up into cookie-sized pieces. Store in an air-tight container up to one week.
Alternative Instructions:
Setting 1/4 cup aside to use later, place semi-sweet chocolate chips in the freezer at least 45 minutes.
Line a large baking sheet with wax paper or aluminum foil; set aside.
Add Fritos to a large mixing bowl; set aside.
Melt white chocolate chips and peanut butter together in the microwave, stopping and stirring every 30 seconds. Take care not to overheat as the white chocolate will “seize up” if heated too long.
Working quickly, gently stir melted white chocolate mixture into Fritos. Stir in frozen chocolate chips then spread evenly onto prepared baking sheet.
Sprinkle remaining chocolate chips evenly over coated Fritos then allow everything to cool until firm.
Once firm, break mixture up into clusters. Store in an air-tight container up to one week.
Notes
Both instruction methods work great and yield similar results. The standard method is much quicker and less fussy but can get a little messy when stirring everything together on the sheet pan.
A decadent no-bake icebox dessert recipe layered with Oreo cookies, chocolate pudding and
cherry pie filling that's super quick and easy to make!
Updated 5/13/26
My recipes fall into a few basic categories: classic recipes almost
everyone’s heard of, Southern favorites, family recipes I grew up with, original
recipes I developed and…
This recipe definitely falls in the "Pure-T Accident" category.
I set a package of Oreos on the table last week while the fam was playing
Rummikub. Before anyone could grab a stack, Baby Girl knocked her glass of water
over and a little bit went into the Oreos.
Trying to salvage them, I
laid paper towels on the counter and lined the Oreos up on them to dry up the
majority that only had a drop or two of water on them.
By the time our game was over it was obvious the
Oreos were unsalvageable. Each one had a slender crescent of cookie sludge on
its side and I knew no one would eat them.
Well, dang.
I am the queen of recycling leftovers (leftover chicken becomes
chicken salad, extra hotdog buns go into the freezer for croutons and panade,
chili becomes “Chili Mac” a few nights later… I could go on and on…) so I just
couldn’t bring myself to toss the Oreos in the trash.
I had a can of cherry pie filling and a box of pudding in the pantry and
some Cool Whip in the fridge and the next thing I knew I threw together the
world’s sloppiest trifle, stuck it in the fridge and hoped for the best.
I
gotta be honest with you on this one… I was not expecting much. I didn’t even
serve it at dinner the next day. I actually forgot about it. I was laying in bed
the next night reading my book and WHAM-O I remembered it!
Hello perimenopause hormones, why yes, I do think there is something chocolate in this house!
I tiptoed into the kitchen, pulled it out, grabbed a spoon and took a bite. It
was so good! I was shocked! I mean, it was really, really good! Good
enough, in fact, that I decided to make it again (a little neater this time)
and share it with you.
The dark chocolate taste from the chocolate
wafers with the bright, tart cherries, the creamy pudding with the cakelike
softened cookies, the hints of sweet cookie filling with the airy whipped
topping… this thing was a homerun!
It has all the components of a
Black Forest Cake so, of course, I had to give it a "Black Forest" name and
honestly, that’s the first thing I thought of when took the first bite.
HOW TO MAKE BLACK FOREST OREO DESSERT
Step 1: Arrange half of the Oreos in the bottom of a baking
dish.
Step 2: Dollop cherry pie filling over cookies.
Step 3: Spoon pudding over cherries.
Step 4:
Arrange remaining Oreos over pudding.
Step 5: Spoon remaining cherry pie filling over cookies.
Step 6:
Top cherries with Cool Whip. Sprinkle with crushed Oreos if desired.
TIP: Make this a lower calorie dessert by using Oreo Thins, sugar-free pudding mix, sugar-free pie filling (sweetened with Splenda) and Cool Whip Lite.
LOOKING FOR MORE NO-BAKE DESSERT RECIPES?
If easy dessert recipes are your favorite kind, pop over to my collection of Easy No-Bake Desserts and take a look around! There's something for everyone with everything from chocolate to fruit to peanut butter!
Recipe for Black Forest Oreo Dessert
Black Forest Oreo Dessert
Yield: 15 Servings
Author: Mandy Rivers
Prep time: 15 MinTotal time: 15 Min
A decadent no-bake icebox dessert recipe layered with Oreo cookies, chocolate pudding and cherry pie filling that's super quick and easy to make!
Ingredients
1 1-lb package of Oreo cookies
1 small box instant chocolate pudding
2 cups milk
2 21-oz. cans cherry pie filling
1 8-oz. carton Cool Whip, thawed
Instructions
Reserve 2 Oreo cookies to garnish with later (if desired) then arrange half of the remaining Oreos in the bottom of a 13x9 baking dish.
Dollop one can of cherry pie filling between and over cookies.
Combine instant pudding mix and milk in a medium bowl then whisk together for 2 minutes. Spoon pudding over cherries.
Arrange remaining Oreos over pudding.
Spoon remaining can of cherry pie filling over cookies.
Top cherries with Cool Whip.
Chop or crush the reserved Oreos (if using) then sprinkle over top of Cool Whip. Cover then refrigerate overnight (or until cookies are soft and cake-like – at least 8 hours).
Cover and refrigerate to store up to one week.
Notes
TIP: Make this a lower calorie dessert by using Oreo Thins, sugar-free pudding mix, sugar-free pie filling (sweetened with Splenda) and Cool Whip Lite.
You don’t HAVE to let this set overnight but the dessert will be entirely different if you don’t. The cookies will be crunchy and chunky instead of soft and cakelike. I’ve had it both ways and prefer the cakelike texture (it’s very much like eating Banana Pudding).
Use the 4-serving box of pudding
The Family Size package of Oreo Cookies is one pound.
You can make this a couple days ahead of when you need it - it keeps fabulously!