Showing posts with label Low Carb. Show all posts

8/25/25

Crispy Baked Chicken Legs

Home » Main Dishes » Crispy Baked Chicken Legs

Perfectly seasoned baked chicken leg drumsticks with crispy skin on the outside that's fall-off-the-bone tender inside! 

Author: Mandy Rivers | Updated: 8/1/26

Chicken leg drumsticks are something I cook a LOT. I started cooking them when the kids were little because A) they were inexpensive and B) kids love drumsticks! At least my kids did (and still do now that they're older).

I love that I can throw them in the oven then move on to other cool things like unloading the dishwasher and folding laundry (or helping with homework, paying bills, checking work email, etc.).

On busy nights, I usually just whip out a box of Uncle Ben's wild rice and can of green beans but these can also transition to a Sunday dinner with the addition of potato salad, cornbread or biscuits, baked beans and whichever green vegetable looked good when I was at the grocery store.

Perfectly seasoned baked chicken leg drumsticks with crispy skin on the outside that's fall-off-the-bone tender inside!

6 FAQ ON CRISPY BAKED CHICKEN LEGS

1. Why add baking powder?  The short answer is science. The baking powder significantly increases the pH in the skin which dehydrates it, allowing it to turn crispy.

2. Can this recipe be used with thighs or wings?  Heck yes! Thighs will cook the same as the recipe. For wings, start the flats first then add the drumettes 5 minutes later (the extra fat on the flats will need the full cooking time but the less insulated drumettes won't need to cook the full 45 minutes).

3. Can I bake these on a baking rack?  You sure can but I love the way the chicken browns on the bottom of the pan (it kinda fries in the rendered fat).

Perfectly seasoned baked chicken leg drumsticks with crispy skin on the outside that's fall-off-the-bone tender inside!

4. Can I use a seasoning blend instead of the spices in the recipe?  Absolutely BUT ONLY IF there is no sugar in the ingredients. Most dry rubs have sugar so make sure whatever you're using doesn't. Sugar will burn at this temperature when cooked this long.

5. Do I have to pour off the liquid in Step 5?  Yes and no. Yes, if you want CRISPY baked chicken. If you don't care about the crispiness, then no (and if that's the case then omit the baking powder).

6. Can I baste the chicken with BBQ or wing sauce?  Yes, ma'am! Once done, baste then return to the oven 5 minutes.

Perfectly seasoned baked chicken leg drumsticks with crispy skin on the outside that's fall-off-the-bone tender inside!

A FEW RECIPE NOTES

  • Use baking POWDER, not baking SODA.
  • Use aluminum-free baking powder (almost all baking powder is aluminum free but check to make sure to avoid any odd tastes).
  • Make sure your baking powder is fresh (see section below to for how to test it).
  • A dozen large chicken legs weighs about 5 pounds. 
  • Any bone-in, skin-on chicken pieces can be used with this recipe. 
  • Boneless or skinless chicken will definitely overcook with this recipe.
  • 1.5 tablespoons is 4.5 teaspoons (for the baking powder).
Perfectly seasoned baked chicken leg drumsticks with crispy skin on the outside that's fall-off-the-bone tender inside!

PRO TIP: HOW TO TELL IF BAKING POWDER IS FRESH

Without stirring, add a teaspoon of baking powder into a cup of HOT tap water. If it's fresh, the baking powder will fizz as it sinks into the water. Don't look for Alka-Seltzer level fizzing, just look for some obvious effervescence, especially around the edges of the little "cake" of baking powder sitting on top of the water.

Perfectly seasoned baked chicken leg drumsticks with crispy skin on the outside that's fall-off-the-bone tender inside!

STOVE-TOP SIDES TO MAKE WITH CRISPY BAKED CHICKEN LEGS

EASY CHEESY PARMESAN ORZO - A simple side dish recipe with orzo pasta cooked in a parmesan cream sauce that comes together in minutes and cooks perfectly every time. 

POLISH NOODLES - A simple homemade side dish recipe with egg noodles, sauteed onions and a simple sour cream sauce very much like the old Noodles Romanoff box mix. 

GARLIC BUTTER MUSHROOM RICE - Mushrooms sautéed with garlic and butter cooked with rice on the stovetop in a savory, beefy stock for a quick and easy side dish. 

COUNTRY-STYLE BABY LIMA BEANS - A no-fail recipe for tender baby lima beans (butterbeans) cooked low and slow with bacon the Southern way. 

WALK-AWAY NOODLES - Throw everything in the pot and walk away for perfectly cooked, savory, saucy hot buttered noodles that are the perfect side dish recipe for any meal! 

BRUSSELS SPROUTS WITH BACON - A simple recipe for fresh Brussels Sprouts sauteed with smokey bacon that is easy to prepare and cooks perfectly every time. 

Recipe for Crispy Baked Chicken Legs

Perfectly seasoned baked chicken leg drumsticks with crispy skin on the outside that's fall-off-the-bone tender inside!

Crispy Baked Chicken Legs

Crispy Baked Chicken Legs
Yield: 12 Drumsticks
Author: Mandy Rivers
Prep time: 10 MinCook time: 50 HourTotal time: 50 H & 10 M

Perfectly seasoned baked chicken leg drumsticks with crispy skin on the outside that's fall-off-the-bone tender inside!

Ingredients

  • 12 large chicken legs
  • 1.5 tablespoons baking powder
  • 2 teaspoons salt
  • 1 teaspoon pepper
  • 1 teaspoon garlic powder
  • 1 teaspoon onion powder
  • 1 teaspoon paprika

Instructions

  1. Preheat oven to 400 degrees. Grease the bottom of a large baking sheet with olive oil (pour 1-2 tablespoons onto pan then spread with basting brush or clean hands).
  2. Blot chicken dry with paper towels then add to a large mixing bowl. 12 chicken legs
  3. Sprinkle baking powder and spices evenly over chicken then toss or stir until chicken is evenly coated. TIP: Using your hands to massage the baking powder and spices into the chicken is the best way to ensure everything is evenly coated. 1.5 Tbsp baking powder, 2 tsp salt, 1 tsp each pepper, garlic powder, onion powder and paprika
  4. Place chicken legs on pan 2-3" apart then bake at 400 degrees for 30 minutes.
  5. Remove from oven then pour off any standing liquid. Return pan to oven.
  6. Continue cooking 20 minutes or until juices run clear. TIP: switch to convection mode if your oven has the option the last 15 minutes of cooking for crispier skin!

Notes

  • Use baking POWDER, not baking SODA.
  • Use aluminum-free baking powder (almost all baking powder is aluminum free but check to make sure to avoid any odd tastes).
  • Make sure your baking powder is fresh (see FAQ above to see how to test it).
  • A dozen large chicken legs weighs about 5 pounds. 
  • Any bone-in, skin-on chicken pieces can be used with this recipe. 
  • Boneless or skinless chicken will definitely overcook with this recipe.
  • 1.5 tablespoons is 4.5 teaspoons (for the baking powder).

Author: Mandy Rivers

crispy baked chicken legs, crispy baked chicken drumsticks, oven, baked, oven-baked, crispy, crispiest, baked fried chicken, chicken legs, chicken leg drumsticks, best, how to, baking powder, seasoned
dinner
American
Keep up with my latest shenanigans by following South Your Mouth!


11/28/21

Garlic Parmesan Roasted Broccoli

Home » Side Dishes » Garlic Parmesan Roasted Broccoli

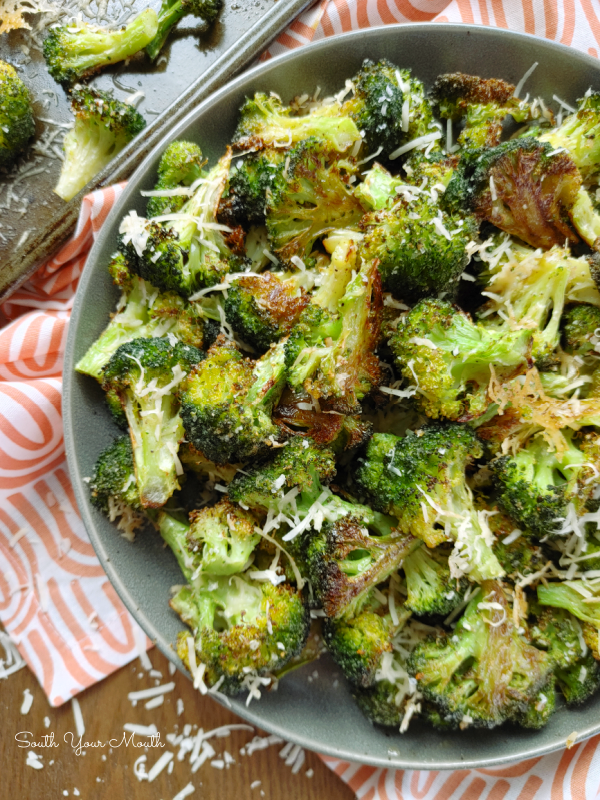
The BEST recipe for fresh broccoli with olive oil and garlic roasted in the oven at a super high temperature then topped with freshly grated parmesan cheese.

Garlic Parmesan Roasted Broccoli! The BEST recipe for fresh broccoli with olive oil and garlic roasted in the oven at a super high temperature then topped with freshly grated parmesan cheese.

I mentioned this when I published my Better Broccoli Cheese Casserole but I LOVE broccoli. Like, maybe even abnormally so. 

I like the crappy frozen stuff nuked in the microwave. I don’t mind it if it’s been overcooked in boiling water and it waterlogged and mushy. I love it steamed with just a little kosher salt. I like it raw in salads and veggie plates. I just love it.

But my favorite way to have it is like this… roasted in a crazy hot oven, slightly charred, then sprinkled with fresh parmesan and a little coarse gain salt.

Garlic Parmesan Roasted Broccoli! The BEST recipe for fresh broccoli with olive oil and garlic roasted in the oven at a super high temperature then topped with freshly grated parmesan cheese.

While I love it with a passion, MY ENTIRE FAMILY hates it. They think it stinks when it’s cooking and make puke faces when they taste it. I feel personally offended that they don’t like broccoli. Like… how?

I’ve always loved broccoli roasted like this (and brussels sprouts too!) but I recently learned something about it on my favorite recipe site, Serious Eats (which focuses on the science of cooking).

By cooking the broccoli SUPER FAST at an EXTREMELY HIGH TEMPERATURE it prohibits the development of the characteristic bitter taste and sulfurous aroma and instead brings out a nutty, almost sweet flavor through caramelization.

Garlic Parmesan Roasted Broccoli! The BEST recipe for fresh broccoli with olive oil and garlic roasted in the oven at a super high temperature then topped with freshly grated parmesan cheese.

You may wonder why I use garlic powder instead of fresh garlic in this recipe. I mean, it’s a kinda fancy recipe and garlic is one of the feature flavors, so why use the junky stuff, right?

The reason is that fresh garlic would burn and become very bitter cooked this hot for this long. Sooo… the powdered stuff, it is. If you're absolutely averse to this idea, you can sauté several cloves of fresh minced garlic in the olive oil before assembling the recipe. Just remove the garlic first.

Speaking of the olive oil... this may seem like a lot of oil but it really isn’t. 1/4 cup is only 4 tablespoons. That’s 4 tablespoons for 2 whole pounds of broccoli. One tablespoon for half a pound. That’s actually pretty sparse!

Garlic Parmesan Roasted Broccoli! The BEST recipe for fresh broccoli with olive oil and garlic roasted in the oven at a super high temperature then topped with freshly grated parmesan cheese.

I may lose some of you here but before you start sending me hate mail, just hear me out. Don’t wash the broccoli. The broccoli needs to be bone-dry to cook properly this way.

But what about bacteria and germs and viruses and lions and tigers and bears?!

Well, here’s the thing... cold water isn’t going to kill any of those things. Well, you could drown a large mammal in cold water but that’s about it. So, other than rinsing off some sand or dirt, washing the broccoli doesn’t do anything. And I’ve never come across any grit in any broccoli I’ve ever purchased. Never. 

Garlic Parmesan Roasted Broccoli! The BEST recipe for fresh broccoli with olive oil and garlic roasted in the oven at a super high temperature then topped with freshly grated parmesan cheese.

DISHES TO SERVE WITH GARLIC PARMESAN ROASTED BROCCOLI 

I like to serve this with sauced pasta dishes. I find that I eat way less pasta and actually like to serve a little sauce over the broccoli. Try it with:

  • Homemade Spaghetti & Meat Sauce - A hearty classic Italian pasta sauce recipe made from scratch with sausage and ground beef. Perfect for feeding a crowd or stocking your freezer with an easy weeknight meal.
  • Chicken Lazone - An easy recipe with Cajun roots made with seasoned chicken pan-fried until golden in butter finished with an easy creamy pan sauce served over pasta.
  • Classic Chicken Cacciatore - An authentic Italian recipe for chicken braised in a rustic tomato sauce so tender it falls off the bone perfect over pasta or risotto.
  • Chicken Parmesan - My tried-and-true recipe for crispy chicken cutlets breaded in parmesan and bread crumbs topped with gooey melted mozzarella over marinara sauce.
  • Easy Shrimp with Pasta - A quick and easy pasta recipe with seasoned sauteed shrimp, your favorite pasta sauce and freshly grated parmesan!
  • Bolognese Sauce - A rich Italian meat sauce recipe made with beef and pork with layers of flavor perfect over pasta or in lasagna.

Recipe for Garlic Parmesan Roasted Broccoli

Garlic Parmesan Roasted Broccoli! The BEST recipe for fresh broccoli with olive oil and garlic roasted in the oven at a super high temperature then topped with freshly grated parmesan cheese.

Garlic Parmesan Roasted Broccoli

Garlic Parmesan Roasted Broccoli
Yield: 8 Servings
Author: Mandy Rivers | South Your Mouth
Prep time: 5 MinCook time: 20 MinTotal time: 25 Min

The BEST recipe for fresh broccoli with olive oil and garlic roasted in the oven at a super high temperature then topped with freshly grated parmesan cheese.

Ingredients

  • 2 lbs broccoli florets
  • 1/4 cup olive oil, plus more for pan
  • 2 teaspoons garlic powder
  • 1 teaspoon coarse grain salt
  • 1 teaspoon pepper
  • 1/2 cup fresh grated parmesan cheese

Instructions

  1. Preheat oven to 500 degrees. Drizzle a few tablespoons olive oil in an extra-large sheet pan (or two standard size pans). Using your hands or a pastry brush, spread oil over pan to coat well.
  2. Cut florets in half lengthwise then add to the center of the pan, making a mound.
  3. Drizzle 1/4 cup olive oil over broccoli then gently toss to coat.
  4. Sprinkle garlic, salt and pepper over broccoli then toss again to evenly distribute the spices.
  5. Spread broccoli evenly over pan, turning florets so that cut side faces down.
  6. Bake at 500 degrees for 18-22 minutes or until deeply browned and crispy on the bottom and slightly charred on top. Watch closely as the bottoms will burn before the top side will. If your oven doesn’t distribute heat evenly, gently stir the broccoli halfway through cooking (moving the broccoli from the edges to the center and vice versa).
  7. Remove broccoli from oven then immediately sprinkle with grated parmesan cheese. Taste for seasoning then sprinkle with a little extra coarse grain salt if desired.
Parmesan Roasted Broccoli, Garlic Parmesan Roasted Broccoli, broccoli, roasted, baked, oven, best, how to, parmesan, parmesean, cheese, garlic, fresh, crispy, charred, char, how long, what temperature, how hot, recipe
side dish, vegetables
american
Keep up with my latest shenanigans by following South Your Mouth!


2/12/21

Baked Blackened Cod

Home » Seafood & Fish » Baked Blackened Cod

A quick and easy recipe for baked cod seasoned with blackening spices – using a prepared blend or the included Blackening Seasoning Recipe – that’s ready in under 15 minutes!

Growing up, one of my favorite things to eat was Blackened Rockfish. Rockfish is what we call large striped bass here in my neck of South Carolina and we caught ours in the Congaree River which starts in Columbia where the Saluda and Broad Rivers come together and runs to Lake Marion (or Santee as we call every bit of water in that area).

Maybe I loved it so much because it is so perfectly delicious or maybe I loved it because cooking it was somewhat of an event. Or maybe I loved it because if we were cooking rockfish that meant we’d been fishing!

I loved fishing for rockfish. We’d start the day fishing for bait like little bream along the banks and creeks of the Congaree in Daddy’s little johnboat (as he would say, ya can’t have too big 'a boat or you can’t get up in the creeks). Once we had our bait, we’d anchor in the middle of the river, throw out lines, then eat canned sardines and Vienna (VIE-eenie) sausages and wait for a monster to hit a line. 

Baked Blackened Cod - A quick and easy recipe for baked cod seasoned with blackening spices – using a prepared blend or the included Blackening Seasoning Recipe – that’s ready in under 15 minutes!

I’ve got to walk down memory lane for a quick second here... At the mention of all this, I am reminded of the last time Daddy and I went fishing (just the two of us). I was nine months pregnant with The Boy and somehow talked him into taking me down to Santee to go fishing in Stump Hole, which is a cypress swamp known for alligators and the cypress roots that grow up out of the black water like some mysterious little swamp creatures.

Because isn't that what every pregnant woman dreams of doing in her ninth month of pregnancy? In the heat of the summer?

Everything was going great until I, well… until my big pregnant behind had to tinkle. Can you imagine the pair of us? Me, as big around as a house, trying to hang my inflated arse over the side of the boat without falling in and him, trying to help me while simultaneously diverting his eyes, fussing the whole time about what a bad idea it was? And then doing it three more times before we called it a day? Oh, we laughed!

Baked Blackened Cod - A quick and easy recipe for baked cod seasoned with blackening spices – using a prepared blend or the included Blackening Seasoning Recipe – that’s ready in under 15 minutes!

Anyway... to blacken the rockfish, we’d get a giant cast iron skillet white-hot over a propane cooker outside, dip the fish in butter, coat it in blackening seasoning and throw it in the pan. Smoke would engulf everything, and you couldn’t see or breathe for what felt like 10 minutes, but what came out of that pan a few short minutes later was pure gold. 

We haven’t tried to make it since Daddy passed away a few years ago (seriously, I’m pretty sure we’d burn the house down and without Daddy, there’s no more fishing the river) but I sure have missed it! So I decided to try to create a recipe with the same flavors.

This, obviously, isn’t truly blackened fish (the “blackened” part comes from literally burning the spices onto the fish) and store-bought cod will never hold a candle to fresh-caught rockfish but this recipe is SUPER easy and very delicious so I couldn’t be happier!

Baked Blackened Cod - A quick and easy recipe for baked cod seasoned with blackening spices – using a prepared blend or the included Blackening Seasoning Recipe – that’s ready in under 15 minutes!

TIPS FOR COOKING BAKED BLACKENED COD

  • Try to buy thicker pieces of cod such as Alaskan (or Pacific) or cod loins (sometimes called “captain’s cut"). For this recipe try to find cod that’s about an inch thick. If using something thinner, cook for 2-3 minutes less and sprinkle the seasoning on instead of coating it.
  • Cooking the fish on the lemon slices will make it taste fabulous and, more importantly, keep the fish from soaking in the fishy juices that will cook out of the cod. Like it or not, most store-bought fish (even that we buy from the seafood counter in the fancy grocery stores) has been frozen so it will put out quite a bit of moisture when cooked.
  • I mostly use a prepared blackening seasoning blend but the spice mixture listed below is one my family has used for years when blackening seafood.
  • Haddock or pollock are great substitutes for cod but really, any thick, flaky white fish will work.  
Baked Blackened Cod - A quick and easy recipe for baked cod seasoned with blackening spices – using a prepared blend or the included Blackening Seasoning Recipe – that’s ready in under 15 minutes!

HOW TO MAKE BLACKENING SEASONING 

I often use Paul Prudhomme’s Blackened Redfish Magic seasoning blend but I can’t always find it. The spice mixture listed below is one my family has used for years when blackening seafood.

1 tablespoon paprika
2 teaspoons salt
1 teaspoon onion powder
1 teaspoon garlic powder
1 teaspoon cayenne pepper
3/4 teaspoon white pepper
3/4 teaspoon black Pepper
1/2 teaspoon thyme
1/2 teaspoon oregano

Baked Blackened Cod - A quick and easy recipe for baked cod seasoned with blackening spices – using a prepared blend or the included Blackening Seasoning Recipe – that’s ready in under 15 minutes!

HOW TO TELL WHEN COD IS DONE?

The best way to tell if your fish is done is by cutting with a fork at the thickest point (see photos directly above and below). The fish will flake easily when it's done and it will lose its translucent or raw appearance. 

Cod can overcook quickly and become dry so err on the side of caution with it. Like with a good steak, a thick piece of cod will continue to cook once removed from the oven or grill. 

Baked Blackened Cod - A quick and easy recipe for baked cod seasoned with blackening spices – using a prepared blend or the included Blackening Seasoning Recipe – that’s ready in under 15 minutes!

WHAT TO SERVE WITH BLACKENED FISH?

French fries are an obvious good choice (hey, Fish n’ Chips is a popular menu option for a reason – they’re delicious together!). I typically serve baked fish with my Greek Potatoes or baked potatoes and a green veggie like broccoli or asparagus.

But blackening seasoning reminds me of Louisiana which makes me think of Southern food. I served this batch with Charleston Red Rice and a mess of Southern-Style Collard Greens and it was divine!

Recipe for Baked Blackened Cod

Baked Blackened Cod - A quick and easy recipe for baked cod seasoned with blackening spices – using a prepared blend or the included Blackening Seasoning Recipe – that’s ready in under 15 minutes!

Baked Blackened Cod

Baked Blackened Cod
Yield: 8 Servings
Author: Mandy Rivers | South Your Mouth
Prep time: 5 MinCook time: 10 MinTotal time: 15 Min

A quick and easy recipe for baked cod seasoned with blackening spices – using a prepared blend or the included Blackening Seasoning Recipe – that’s ready in under 15 minutes!

Ingredients

  • 8 cod fillets (about 2 lbs)
  • 1 stick of butter, melted
  • 3 tablespoons blackening seasoning
  • 2 lemons
Blackening Seasoning Spices
  • 1 tablespoon paprika
  • 2 teaspoons salt
  • 1 teaspoon onion powder
  • 1 teaspoon garlic powder
  • 1 teaspoon cayenne pepper
  • 3/4 teaspoon white pepper
  • 3/4 teaspoon black pepper
  • 1/2 teaspoon thyme
  • 1/2 teaspoon oregano

Instructions

  1. See notes before proceeding with recipe. Preheat oven to 450 degrees.
  2. Cut lemons into slices then arrange on a baking sheet. The fish shouldn’t stick but if the pan you’re using is prone to sticking, spray lightly with cooking spray before adding lemons.
  3. Melt butter in a pie plate or other shallow dish; set aside.
  4. Add blackening seasoning to a separate, similar size dish; set aside.
  5. Pat cod fillets dry with paper towels or a clean kitchen towel. Working one at a time, dip fillets in butter, coating both sides, then allow excess butter to drip off each piece.
  6. Gently lay the fish in the dish with the blackening seasoning to coat one side of the fish with seasoning.
  7. Place the cod, seasoned side up, in the pan on top of the lemon slices.
  8. Repeat until all pieces of cod are seasoned and arranged evenly in the baking dish.
  9. Bake at 450 degrees for 10-12 minutes or until fish is cooked through.

Notes

  • I use Paul Prudhomme’s Blackened Redfish Magic seasoning blend but the spice mixture listed above is one my family has used for years when blackening seafood if you’d like to make your own seasoning.
  • Try to buy thicker pieces of cod such as Alaskan (or Pacific) or cod loins (sometimes called “captain’s cut). For this recipe try to find cod that’s about an inch thick. If using something thinner, cook for 2-3 minutes less and sprinkle the seasoning on instead of coating it.
  • Cooking the fish on the lemon slices will make it taste fabulous and, more importantly, keep the fish from soaking in the fishy juices that will cook out of the cod. Like it or not, most store-bought fish (even that we buy from the seafood counter in the fancy grocery stores) has been frozen so it will put out quite a bit of moisture when cooked.
  • The best way to tell if your fish is done is by cutting with a fork at the thickest point. The fish will flake easily when it's done and it will lose its translucent or raw appearance. 
  • Haddock or pollock are great substitutes for cod but really, any thick, flaky white fish will work.
Baked Blackened Cod, Baked Blackened fish, baked Cod, cod, fish, redfish, bass, haddock, pollock, blackened, blackening, paul Prudhomme, cajun, creole, lemon, chili, fillet, filet, loin, Alaskan, pacific, lime, baked, easy, quick, best, how to, recipe
main course, dinner, seafood
Cajun
Keep up with my latest shenanigans by following South Your Mouth!
Baked Blackened Cod - A quick and easy recipe for baked cod seasoned with blackening spices – using a prepared blend or the included Blackening Seasoning Recipe – that’s ready in under 15 minutes!


1/27/20

Roasted Vegetable Soup

A protein-packed soup recipe made with bone broth, roasted vegetables and Italian herbs that’s low fat, low calories, low carb, high in protein and PACKED with flavor.


Well, y’all, I went to the doctor last week and she confirmed something I’ve long suspected… I’m fat.

Wait, it’s OK! You don’t have to try to make me feel better about that, I went to a doctor who specializes in helping people lose weight because I need help with it. It’s not like I didn’t know!

I sought out professional care and guidance on this because, for the past several years, no matter what I do, I can’t lose weight. And, I’ve tried everything. Not only can I not lose weight, but I keep gaining.

Roasted Vegetable Soup | A protein-packed soup recipe made with bone broth, roasted vegetables and Italian herbs that’s low fat, low calories, low carb, high in protein and PACKED with flavor.

From what we spoke about and the research I’ve done since my first appointment, I’m confident that one of my problems is that my metabolism isn’t working like it’s supposed to (likely from trying keto so long – a high sugar or high fat diet wreaks havoc on your metabolism).

I’m in the process of doing a modified liquid diet for two weeks to 1) lose a nice chunk of weight at the offset of this process but also because 2) it sort of reboots your metabolism and I need both of those things to happen!

It sounded unbearable at first, but it really hasn’t been that hard and the fact that on Day 5 I’d already lost 8 pounds makes it totally doable. Also, I know this is temporary and I hope this will help my metabolism work for me like it’s supposed to.

Roasted Vegetable Soup | A protein-packed soup recipe made with bone broth, roasted vegetables and Italian herbs that’s low fat, low calories, low carb, high in protein and PACKED with flavor.

On my little custom plan, I’m doing 4 days of all liquid (5 shakes, soups or protein drinks a day) then 3 days with one meal (consisting of lean meat and lots of vegetables) plus 3 shakes, etc.

After a week of eating dehydrated soups I knew I needed to get in the kitchen and make something better! I decided to make a vegetable soup (because I have to eat lots of vegetables during my 3-day leg) that’s PACKED with protein.

I’d never bought bone broth before but man, oh MAN, it’s going to become a staple for me! The brand I bought has 11 grams of protein per cup! That’s just good stuff for everyone who’s eating it! And it tastes great! Just like chicken broth but BETTER!


2/06/17

Pepper Steak

Home » Main Dishes » Pepper Steak

An old-school Southern recipe with a little Asian flare made with stir-fried beef, fresh bell peppers and onions served over rice.

Author: Mandy Rivers | Updated: 7/9/26

This is a dish I grew up eating which, now that I think about it, seems odd considering I grew up waaaaaay out the country in the middle of the Deep South.

We didn't make this with Chinese take-out in mind, we made this to use up all the peppers that our gardens were pumping out.

When I can cook an entrée in less time than it takes me to cook a small pot of rice, I am one happy mama so this is something I make a LOT, especially in the summer when our garden is putting out more bell peppers than I know what to do with (because we always plant WAY too much!)

Pepper Steak! An old-school Southern recipe with a little Asian flare made with stir-fried beef, fresh bell peppers and onions served over rice.

CHINESE TAKE-OUT OR SOUTHERN FOOD?

Most of us think of Chinese take-out when we hear Pepper Steak and don't think of Southern food, but I assure you, Southern folks have been making a version of this for a long time! I'm quite confident it was a dish made to use up all the bell peppers everyone's gardens were producing.

While I don’t think of this recipe as “Chinese food”, you can certainly nudge it closer in that direction by adding more ginger and a little brown sugar or honey to the sauce when you mix it up.

The version of this I grew up eating didn't have soy sauce or ground ginger in it but I really like the little bit of Asian zing they add so I make my pepper steak with both.

Pepper Steak! An old-school Southern recipe with a little Asian flare made with stir-fried beef, fresh bell peppers and onions served over rice.

ABOUT THAT SAUCE...

We used to always make this dish with a cornstarch slurry but I started using a brown gravy mix because it adds just a little more beefy flavor (and that’s all gravy mixes really are: cornstarch and bullion).

If you want enough to sauce to cover your rice like gravy, double the sauce recipe!

I almost always do because rice and gravy go together like sugar and ice tea to us Southerners.

Pepper Steak! An old-school Southern recipe with a little Asian flare made with stir-fried beef, fresh bell peppers and onions served over rice.

If you’re looking for something quick and easy for weeknight meals, you’ll love this one! Don’t look at the ingredient list and think it’s too much.

Most of the ingredients in the sauce are the same things you use on the steak, I just separated them into two sections to make things easier to follow!

Pepper Steak! An old-school Southern recipe with a little Asian flare made with stir-fried beef, fresh bell peppers and onions served over rice.

INGREDIENTS FOR MAKING PEPPER STEAK

  1. Sirloin or bottom round steak
  2. Red & green bell peppers
  3. Onion
  4. Garlic
  5. Black pepper
  6. Brown gravy mix
  7. Soy sauce
  8. Ground ginger (optional)
Pepper Steak! An old-school Southern recipe with a little Asian flare made with stir-fried beef, fresh bell peppers and onions served over rice.

NOTES ABOUT MAKING PEPPER STEAK

  • If you'd like enough sauce to make a gravy for the rice, double the sauce ingredients.
  • If you’re planning to serve this with rice, get your rice cooking before you start cooking the steak as it cooks pretty quickly!
  • Use whichever bell peppers you prefer (green, red or yellow). I like one each green and red but have used every combo under the sun.

Recipe for Pepper Steak

Pepper Steak

Pepper Steak
Yield: 6 Servings
Author: Mandy Rivers
Prep time: 10 MinCook time: 15 MinTotal time: 25 Min

An old-school Southern recipe with a little Asian flare made with stir-fried beef, fresh bell peppers and onions served over rice.

Ingredients

Main Ingredients:
  • 1.5 lbs. sirloin or bottom round steak
  • 1 teaspoon salt
  • 1 teaspoon black pepper
  • Vegetable oil
  • 1 red pepper
  • 1 green pepper
  • 1 large onion
  • 5-6 cloves garlic, minced
Sauce:
  • 1 packet brown gravy mix
  • 1/4 teaspoon ground ginger (or more to taste)
  • 1/2 teaspoon black pepper
  • 1 cup cold water
  • 2 tablespoons soy sauce

Instructions

  1. Read recipe notes before beginning.
  2. Chop peppers and onion into 1-inch pieces; set aside.
  3. Slice steak into 1/4-inch strips then toss with salt and black pepper.
  4. Add just enough vegetable oil to a large skillet to coat the bottom. Heat over high heat until very hot. Add one layer of beef strips to skillet then cook 90 seconds before stirring. After 90 seconds, stir beef strips and continue cooking until most pink is gone (it will finish cooking in the sauce). Remove from skillet then repeat this process until all beef is browned and set aside.
  5. Coat the bottom of the pan with a little more vegetable oil, reduce heat to medium-high then add chopped peppers and onions then sauté for 3-4 minutes. Add minced garlic and continue cooking 2 minutes.
  6. Combine sauce ingredients and mix well. Add sauce to pan with peppers and onions then stir and cook until sauce has thickened and peppers are tender.
  7. Stir browned beef strips (with any rendered juices) into sauce. Cook and stir until meat is heated through.
  8. Serve over rice.

Notes

  • If you'd like enough sauce to make a gravy for the rice, double the sauce ingredients.
  • If you’re planning to serve this with rice, get your rice cooking before you start the steak as it cooks pretty quickly!
  • Use whichever bell peppers you prefer (green, red or yellow). I like one each green and red but have used every combo under the sun.

Author: Mandy Rivers


pepper steak recipe, easy pepper steak, southern pepper steak, southern-style pepper steak, green bell peppers, red bell peppers, onion, southern, easy, best, gravy, soy sauce, pepper steak, recipe, how to, old-fashioned, stirfry, stir-fry
dinner
southern, american
Keep up with my latest shenanigans by following South Your Mouth!